

1. Introduction
In this article, I’ll cover registering a GitLab Runner on a MacOS machine and setting up a runner on an Amazon AWS Ubuntu instance. If you prefer a video demonstration, you can check out the YouTube playlist above.
Project files: https://github.com/JoeyAlpha5/gitlab-runner
The project is a “Hello World” app that contains three files highlighted below:
- A
hello.pyfile that prints out “Hello World” - The
.gitlab-ci.ymlfile that defines the pipeline steps. The file builds the container and pushes it to the GitLab container registry. - A
dockerfileto containerize the app.

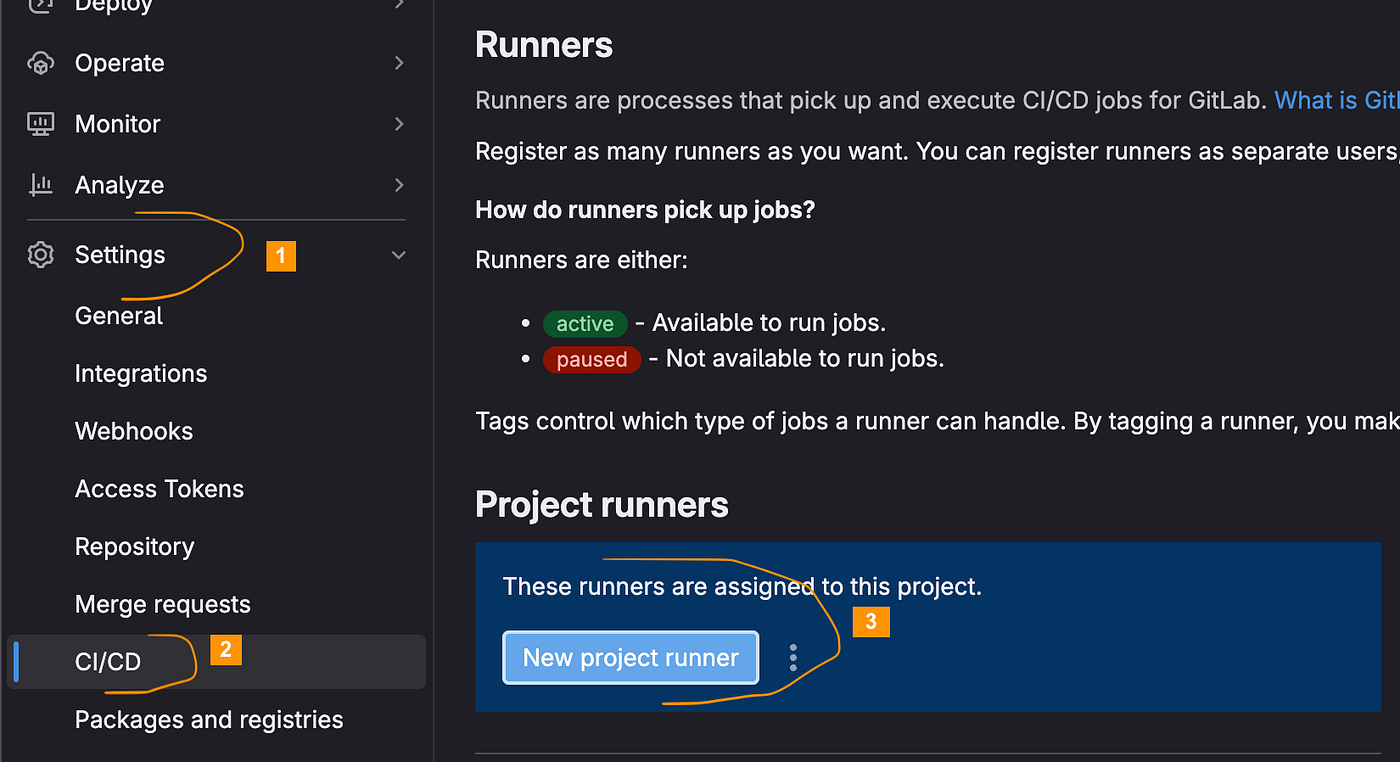
Navigate to the “Runners” section within your GitLab project's CI/CD settings. By default, the project is configured to use the shared instance runners. However, there are instances where using these shared runners may not be preferable. In such cases, you may register your runners to either an on-premises server or a cloud server.
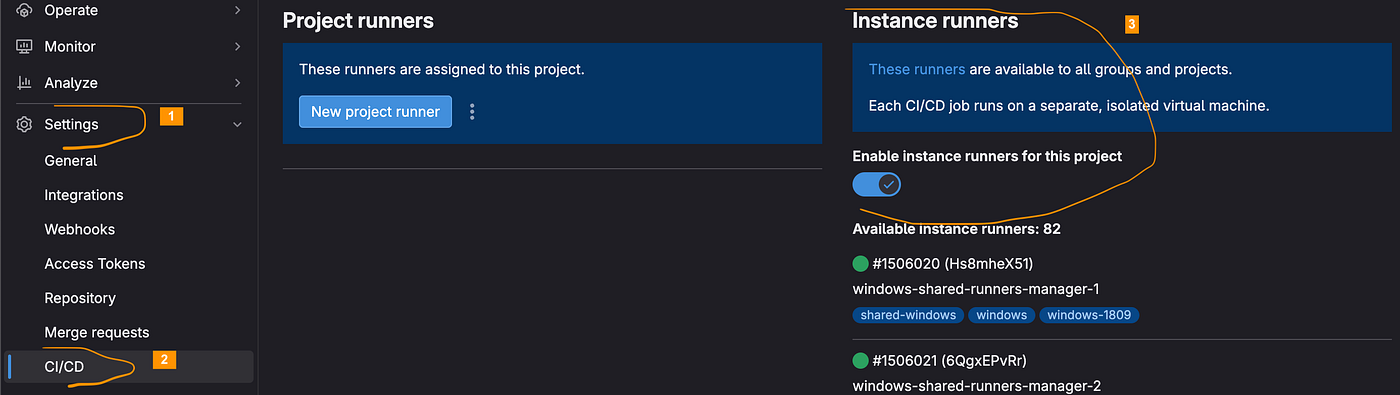
With the current setup, every time I push a commit, the pipeline automatically executes using one of the shared instance runners. As I do not plan to use these shared runners, it is necessary to disable them for this project.
2. MacOS GitLab Runner registration
To set up the runner on your Mac, begin by installing Docker for Mac (https://docs.docker.com/get-docker/). Docker will be used to build the container image and push it to the GitLab container registry.
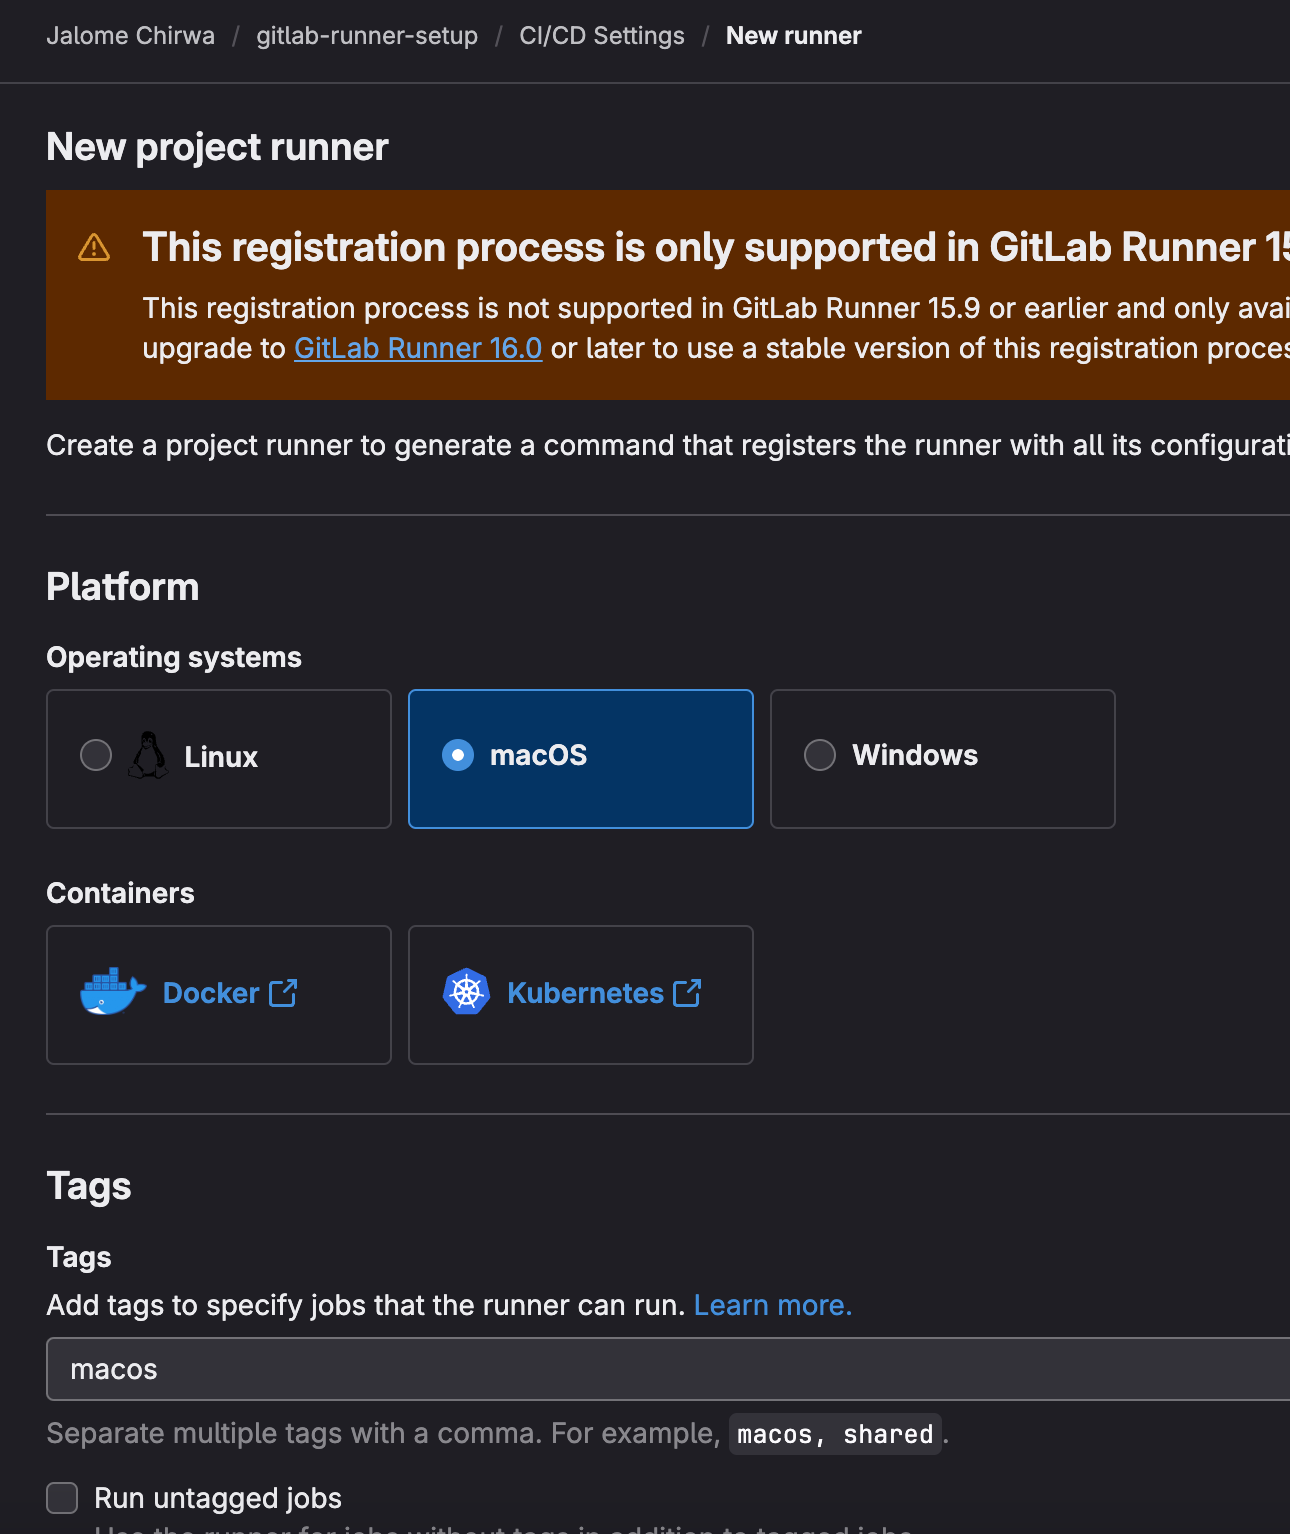
Once Docker is installed, navigate to the GitLab CI/CD settings and locate the “New project runner” button in the “Runners” section. Select the MacOS operating system, and don’t forget to add tags for your runner. These tags will be added to the CI/CD script later on.
The next step is to install the GitLab Runner CLI on your machine. To do that, execute the first two commands highlighted in the image below.
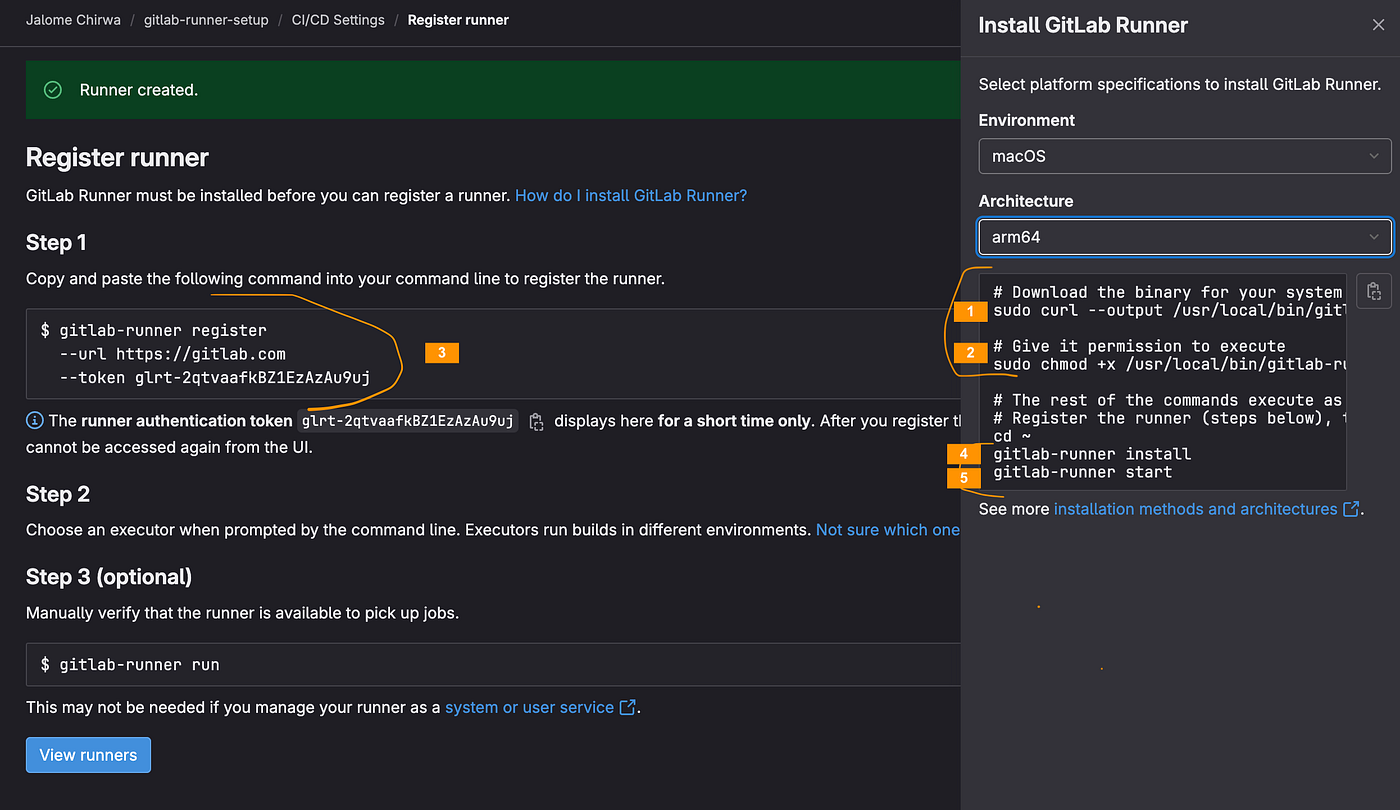
After executing the first two commands, proceed to run the registration command (marked as #3). When executing this command, you’ll be prompted for the following information:
GitLab instance URL: Press enter to continue.A name for the runner: Provide a name for the runner.An executor: Type indocker.Default docker image: Provide the parent image of the dockerfile. In this case, it will bepython:3.8.
Once registration is complete, execute the last two commands from the installation steps to start your runner. Please note that the install command may fail if you don’t specify the user that will be running the gitlab-runner service. I'm logged in as joey on my machine, so my install command will be:
sudo gitlab-runner install -u joeyAfter running the gitlab-runner start command, you should see a success message similar to the one highlighted in the image below. Additionally, the new runner should appear in the “Runners” section of the project’s CI/CD settings.

The pipeline will be stuck in a pending state after pushing a commit. This occurs because we haven’t specified in our CI/CD script which runners to use. To resolve this, we need to provide the runner tag or tags in our .gitlab-ci.yml file. Below is an example of how to specify the runner tag or tags in the file:
build:
  stage: build
  image: docker:latest
  tags:
    - macos # ---> add the macos runner tag from earlier
  # rest of the file content remains the same
After specifying the runner tag/s, the build step will now proceed in the GitLab pipeline. However, you may encounter Docker connection errors during execution. In the next section, we’ll address these issues.
3. Resolving docker build issues
The first error we encountered occurred because the docker login command in the .gitlab-ci.yml file failed. To resolve the issue, we must modify a setting in the runner’s configuration file.
Locate the GitLab Runner configuration file named config.toml in the /etc/gitlab-runner/ directory.
Simply set the privileged variable to true and save the file:
[[runners]]
  name = "My Runner"
  url = "https://gitlab.com/"
  token = "MY_TOKEN"
  executor = "docker"
  [runners.custom_build_dir]
  [runners.docker]
    tls_verify = false
    image = "docker:latest"
    privileged = true # ----> update this value to true and save the file
    disable_entrypoint_overwrite = false
    oom_kill_disable = false
    disable_cache = false
    volumes = ["/cache"]
    shm_size = 0
For the second error (ERROR: Cannot connect to the Docker daemon), you can resolve it by disabling TLS. You can disable TLS in either the services or variables section of the .gitlab-ci.yml file. See the updated .gitlab-ci.yml file below:
build:
  stage: build
  image: docker:latest
  variables: # ---> new section
    DOCKER_DRIVER: overlay2
    DOCKER_TLS_CERTDIR: ""
  services: # ---> new section
    - name: 'docker:20.10.12-dind'
      command: ["--tls=false"]
  tags:
    - macos
4. How to install Docker on an Amazon AWS Ubuntu instance
In this section of the article, we’ll begin setting up an Ubuntu runner on Amazon AWS.
1. Begin by navigating to AWS and launching an EC2 instance. Choose the Ubuntu image.

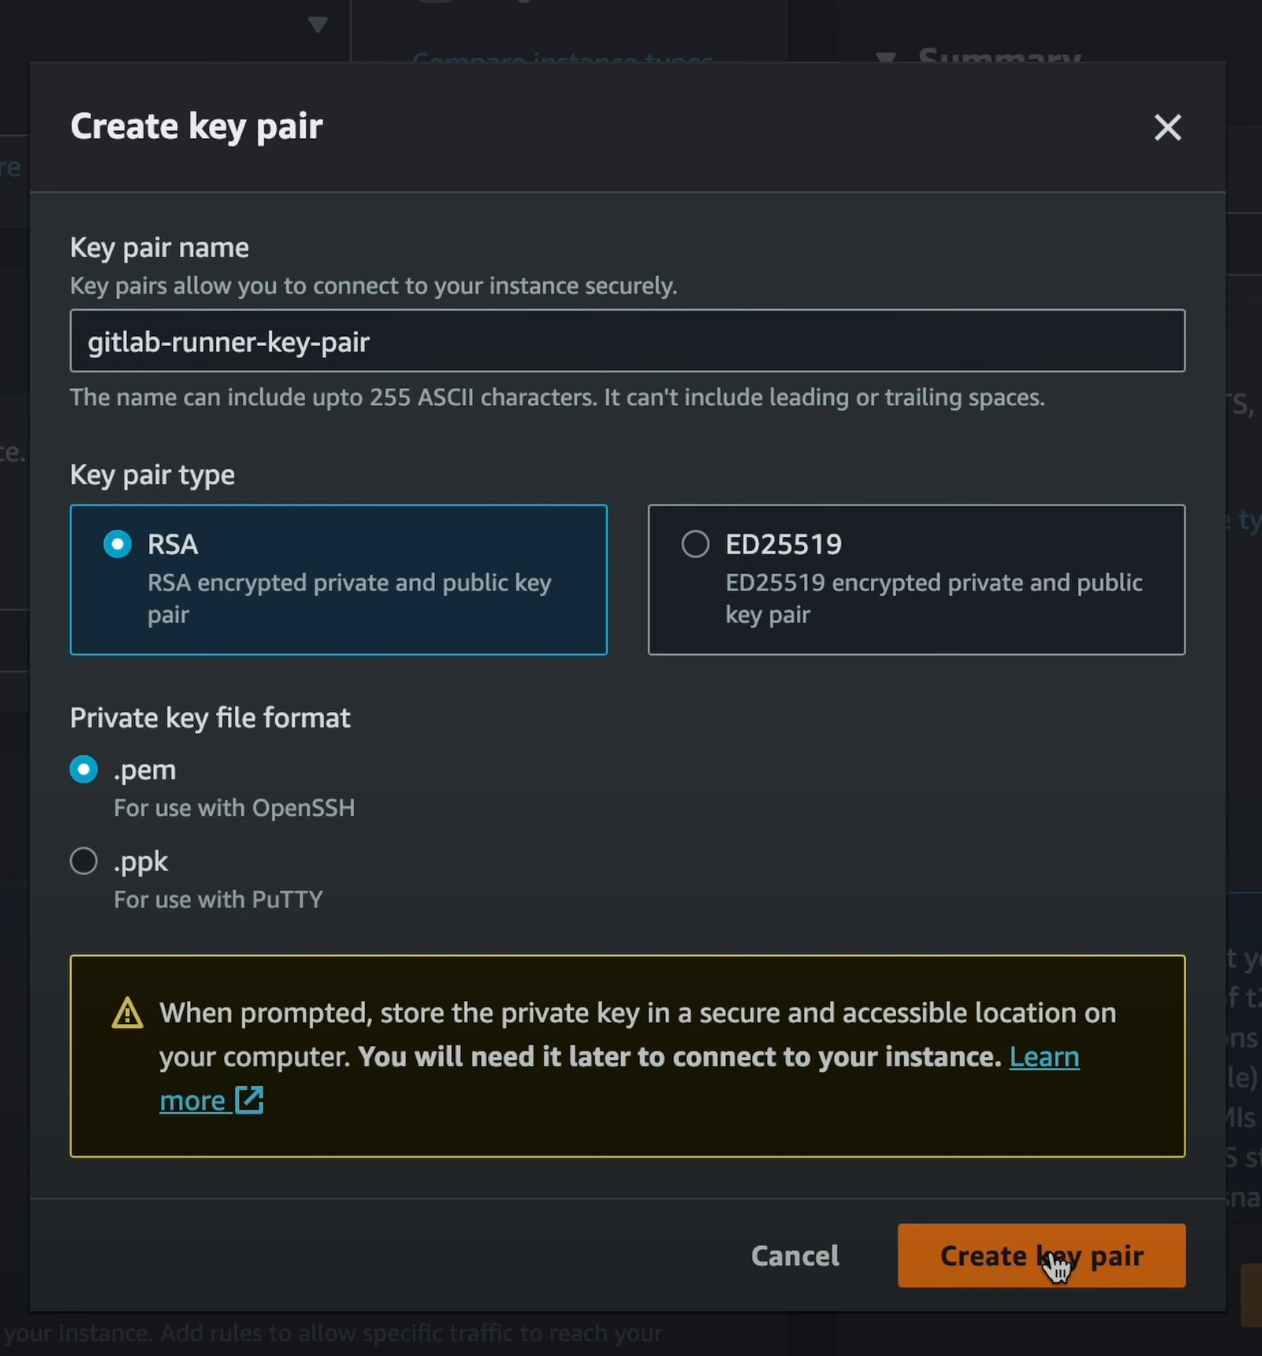
Create a key pair for the instance and download the private key to enable SSH access later.
Finally, proceed to connect to the instance from your terminal using the SSH command.
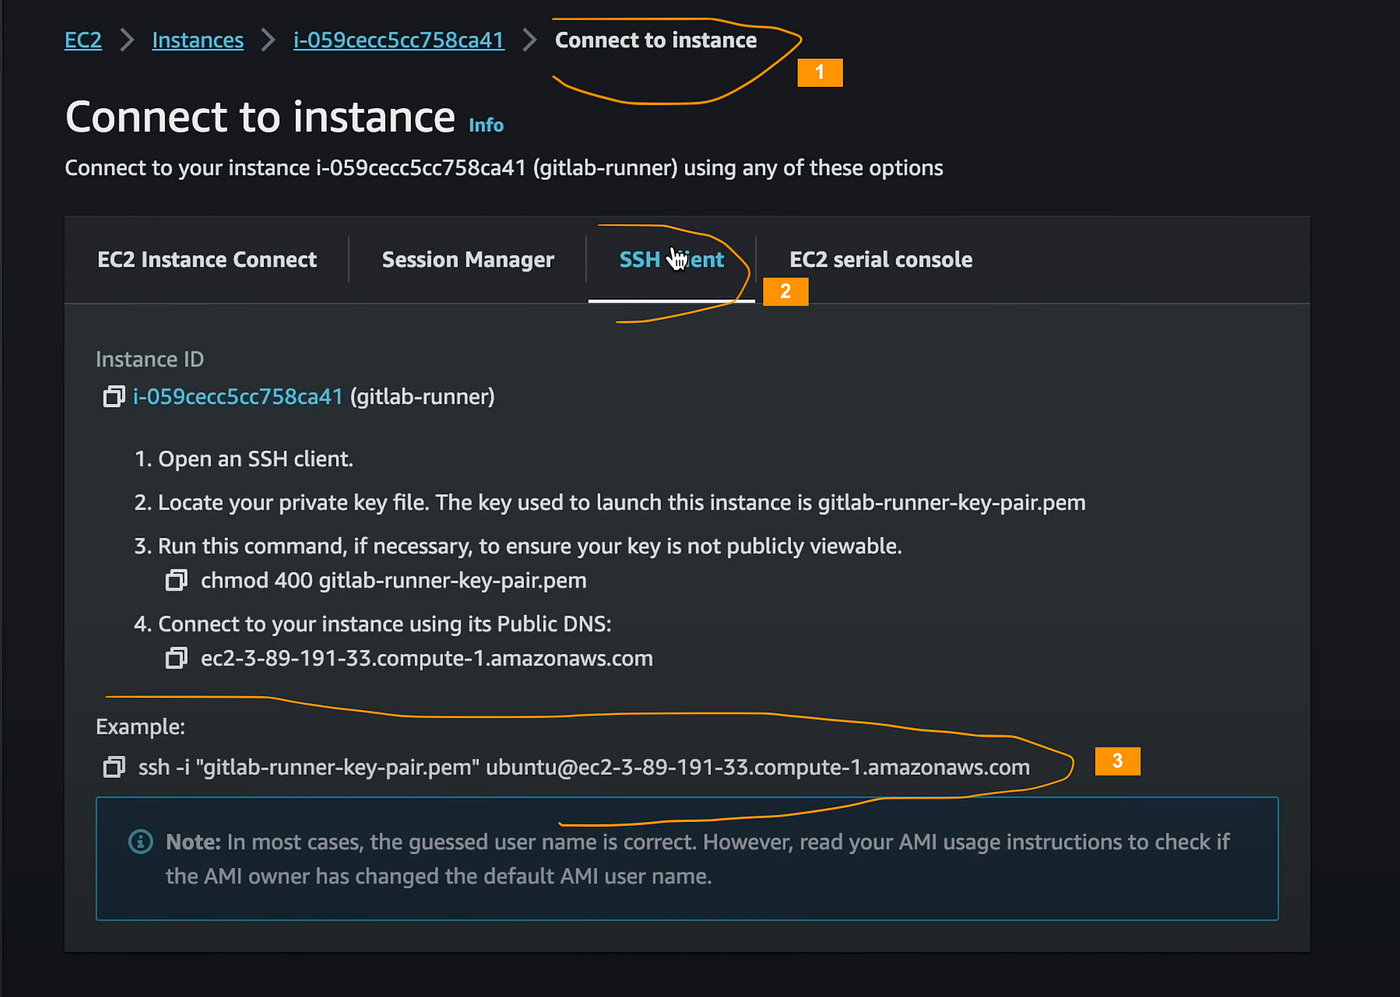
When attempting to SSH into the instance, you may encounter a "WARNING: UNPROTECTED PRIVATE KEY FILE!" error. To resolve this, update the private key file permissions using the command below and then run the SSH command again:
chmod 400 your-downloaded-pk-file.pem2. Proceed by navigating to the “Runners” section in the GitLab project’s CI/CD settings to set up a new Linux runner.
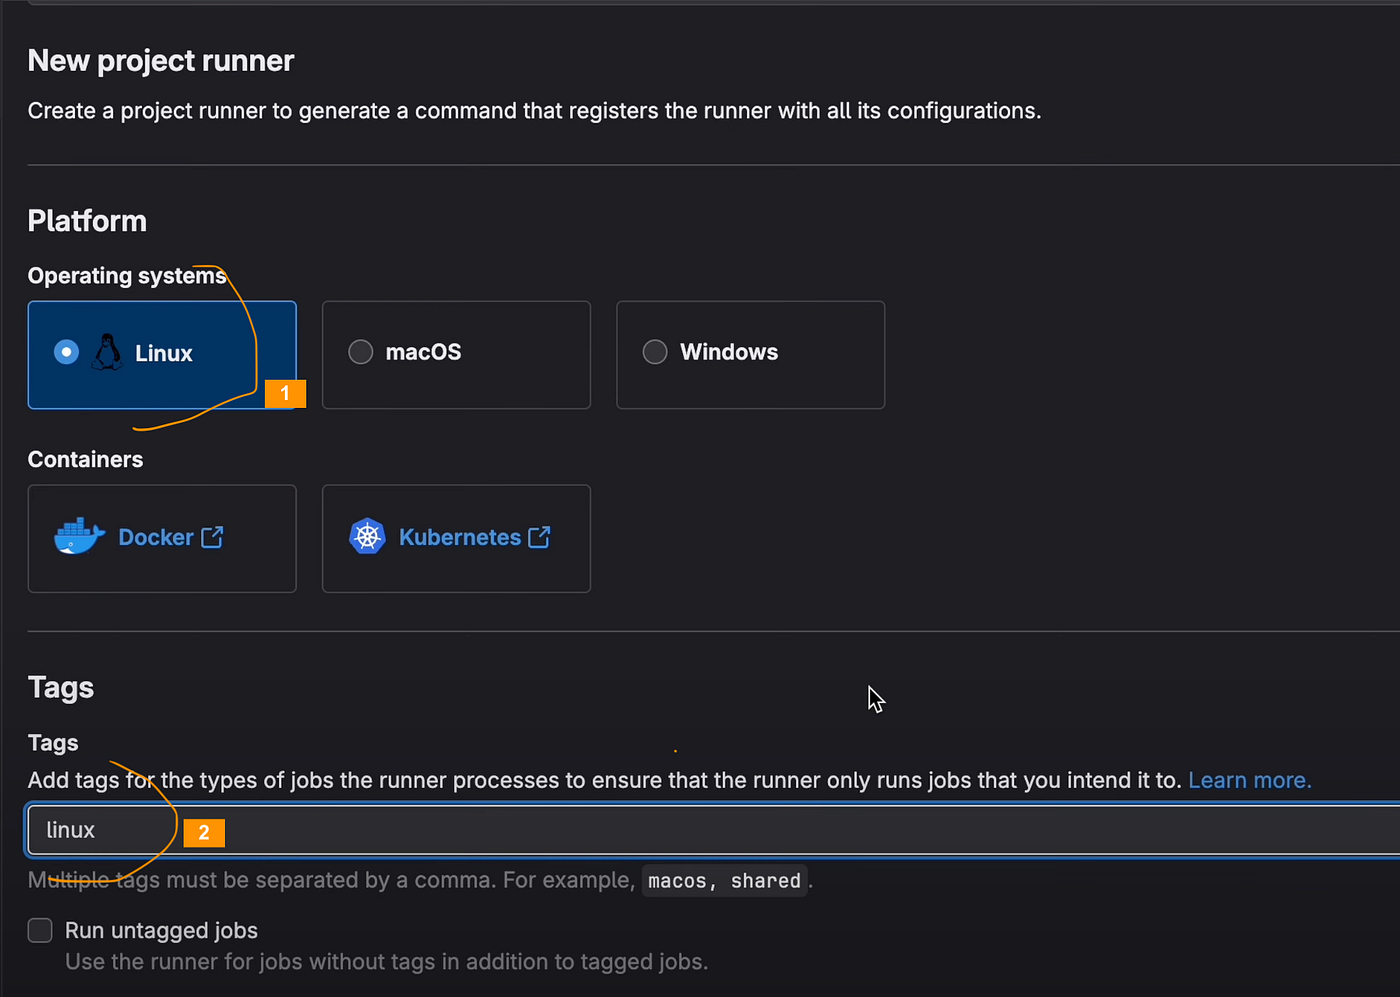
3. After clicking the “Create runner” button, you’ll be guided through the steps to install the GitLab Runner CLI and register your Linux runner.
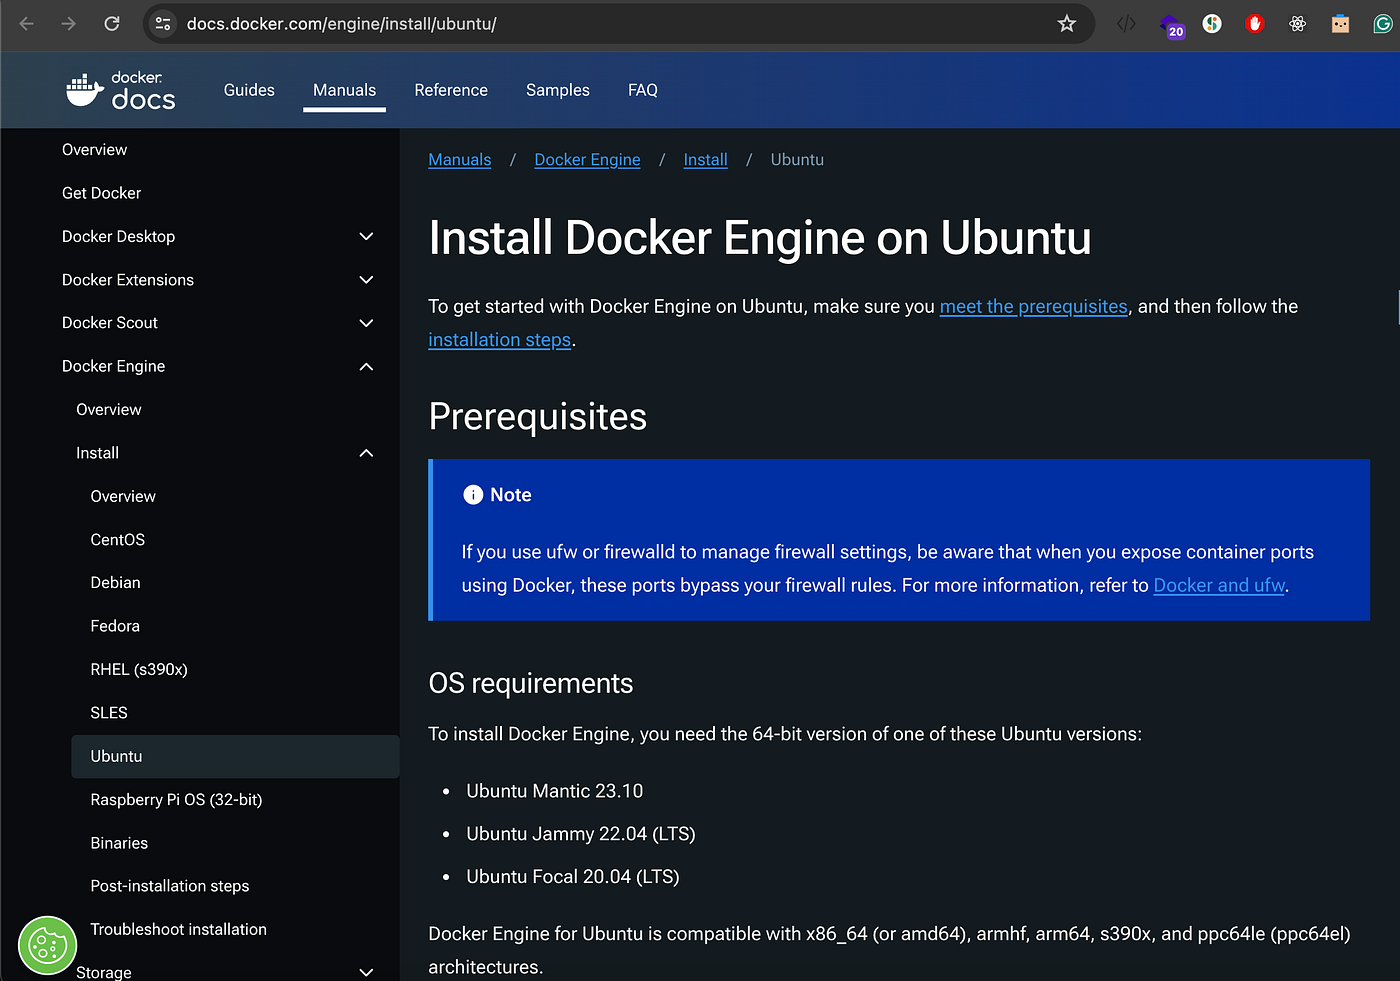
4. Before proceeding with the installation of the GitLab Runner CLI, it’s necessary to install Docker. You can do this by following the official documentation starting with the command to uninstall all conflicting packages.
Docker docs: https://docs.docker.com/engine/install/ubuntu/
5. To confirm if Docker is installed, execute the following command: docker run hello-world. If successfully installed, the command should output a "Hello from Docker!" message.
After confirming that Docker is installed, you can enable Docker to start at boot by running: sudo systemctl enable docker. Finally, reboot the instance to apply the changes.
6. After rebooting the instance, you’ll need to execute the post-install commands to create a Docker group and add the Ubuntu user to the group.
Docker docs: https://docs.docker.com/engine/install/linux-postinstall/
Start by running the command to create the Docker group if it does not exist: sudo groupadd docker. Then add the Ubuntu user to the Docker group and reboot the instance once more: sudo usermod -aG docker ubuntu.
These steps ensure that the Ubuntu user has the necessary permissions to use Docker without requiring sudo privileges.
5. How to set up a GitLab Runner on an Amazon AWS Ubuntu instance
Once docker is installed successfully on the EC2 instance, you can proceed to the GitLab Runner registration and CLI installation steps.
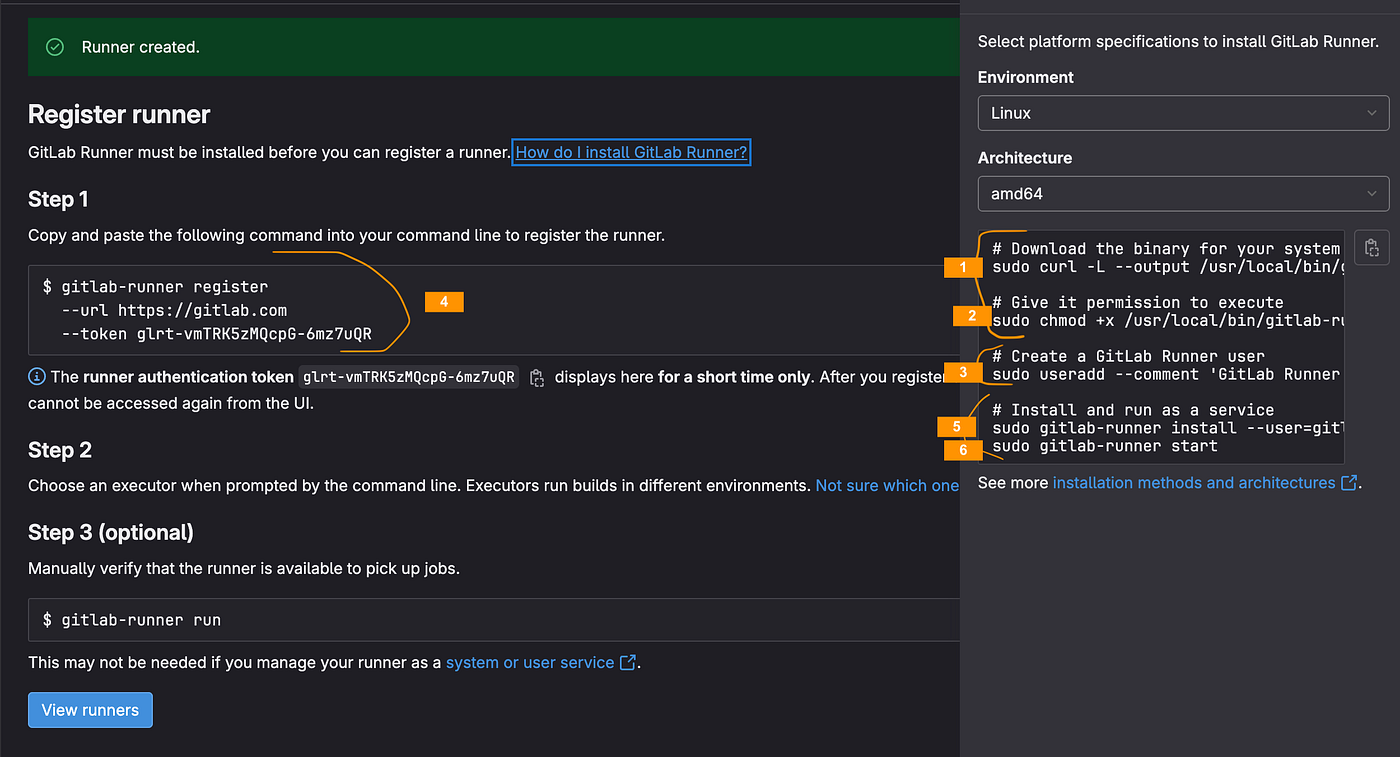
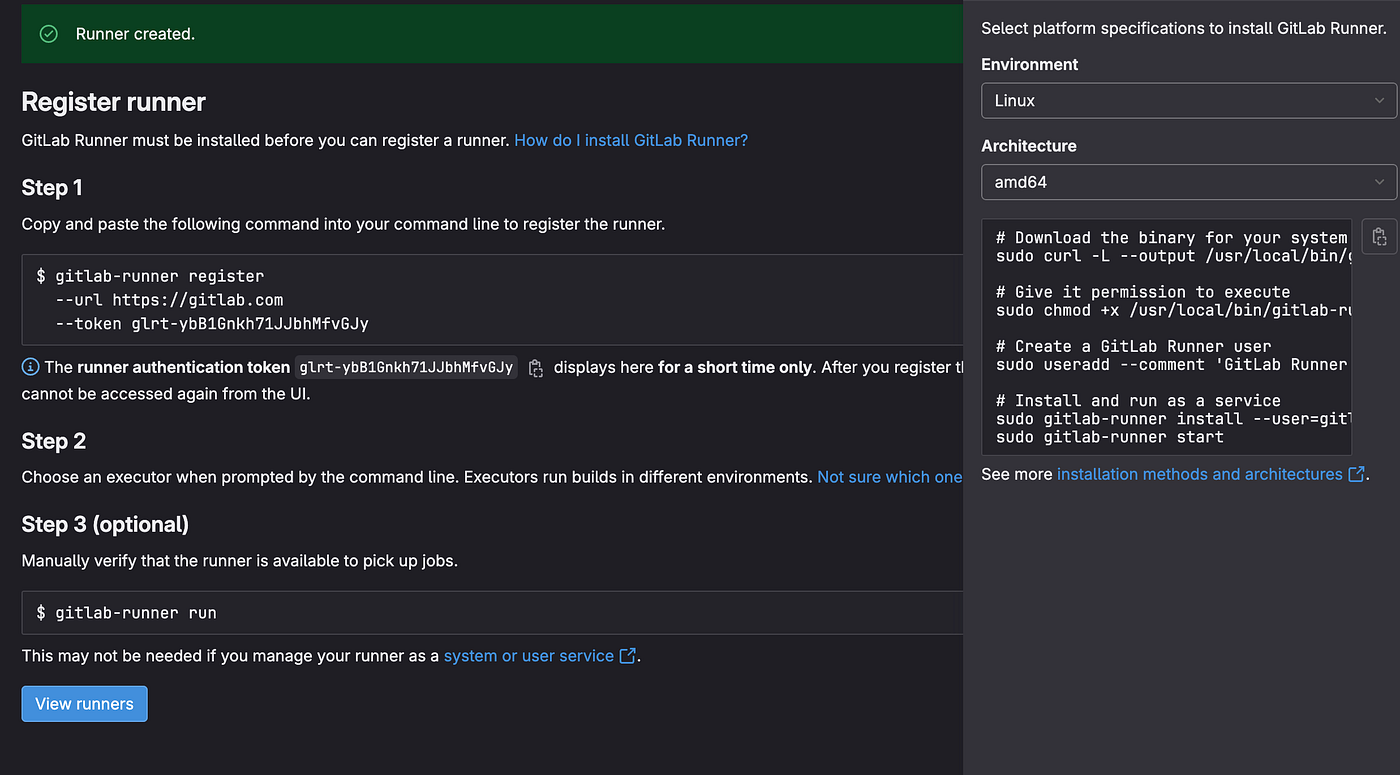
- First, install the GitLab Runner CLI, by executing the first two commands (marked as #1 and #2).
- Next, create a GitLab Runner user using the command marked as #3.
- Add the
gitlab-runneruser to the docker group:sudo usermod -aG docker gitlab-runner - Afterward, run the registration command (marked as #4). Select
dockeras the executor and providepython:3.8as the default image. - Finally, execute the last two commands (marked as #5 and #6) to complete the setup process.
After running the gitlab-runner start command, you should see a success message and the new runner should appear in the “Runners” section of the project’s CI/CD settings.
As with the MacOS setup, update your .gitlab-ci.yml file to specify the linux runner tag. If you encounter Docker connection errors, please refer to the Resolving docker build issues section.