
1. Introduction
This article demonstrates a professional, zero-downtime homogeneous database migration from a local "on-premise" PostgreSQL database to AWS RDS.
It demonstrates the process that AWS DMS runs "under the hood" when migrating a homogeneous database. Instead of relying on a managed service, this architecture manually implements PostgreSQL Native Logical Replication (Publication/Subscription) operating securely over a Site-to-Site IPsec VPN tunnel. It includes a Python script simulating live order traffic to prove that data continuously syncs during the migration process.
You can download the full source code for this project on GitHub: Download the Source Code
2. Architecture Overview
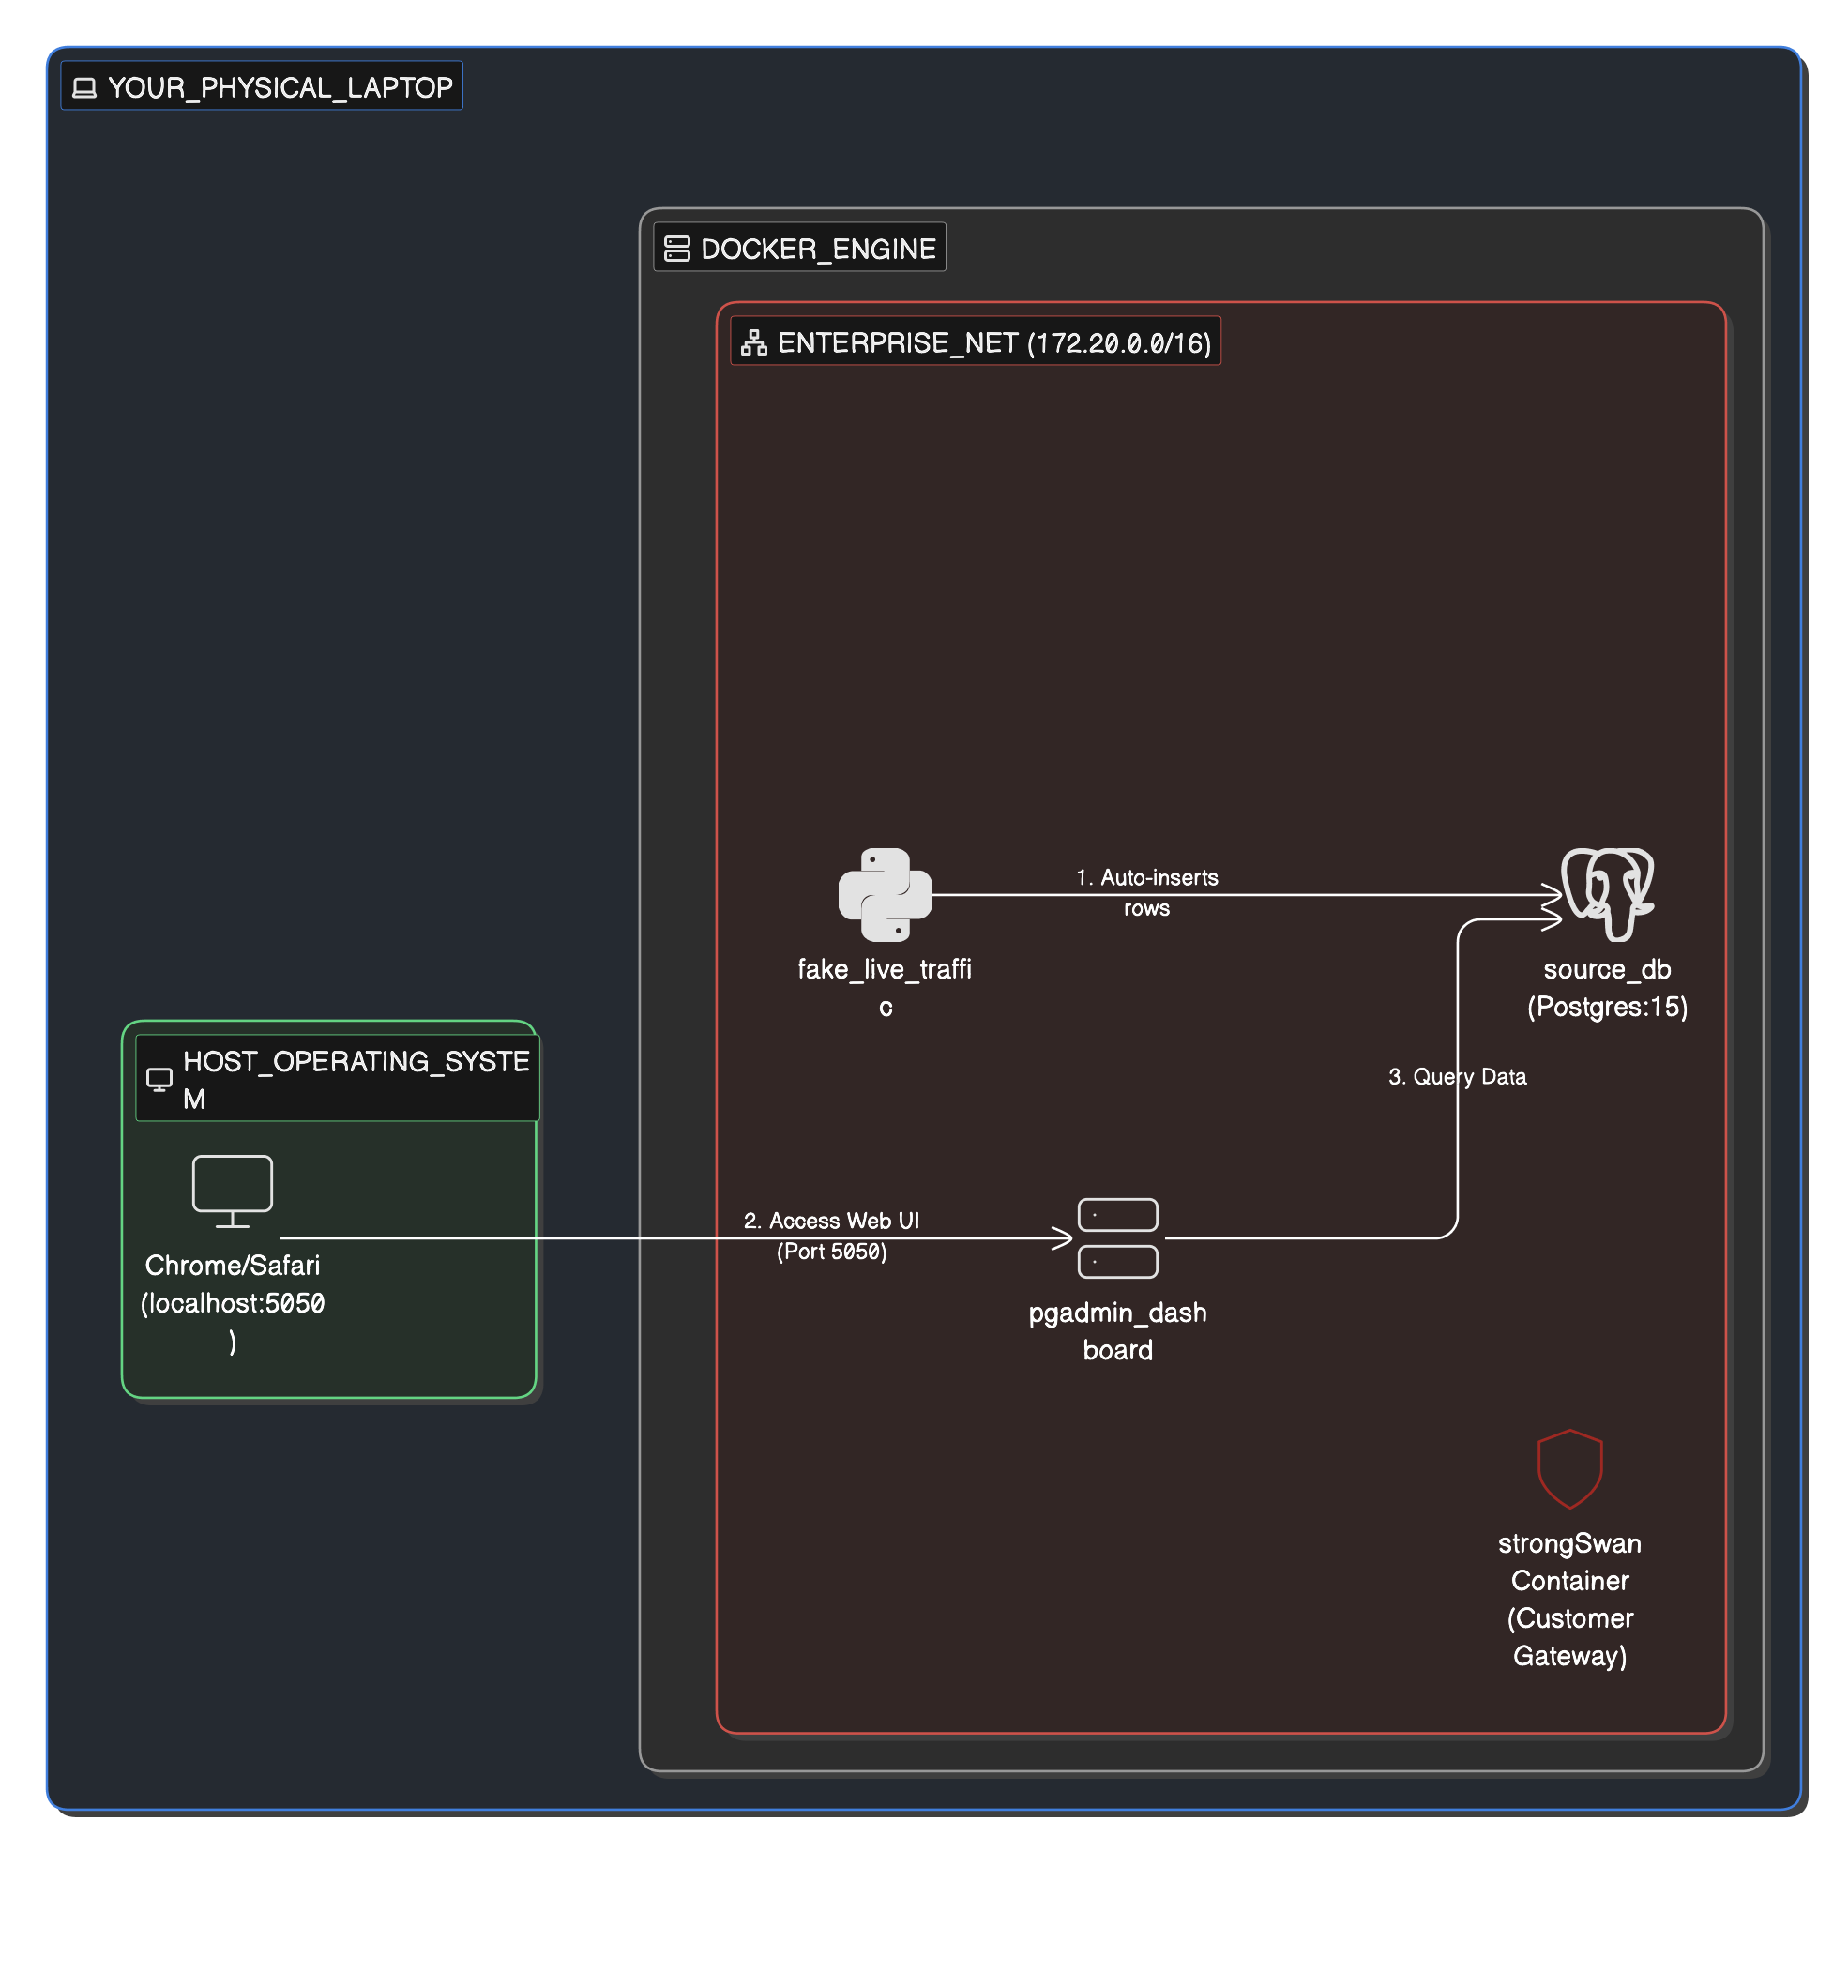
1. The On-Premise Environment
Simulated using Docker, this environment contains the source PostgreSQL database, a pgAdmin dashboard, and a live Python application generating mock e-commerce transactions.
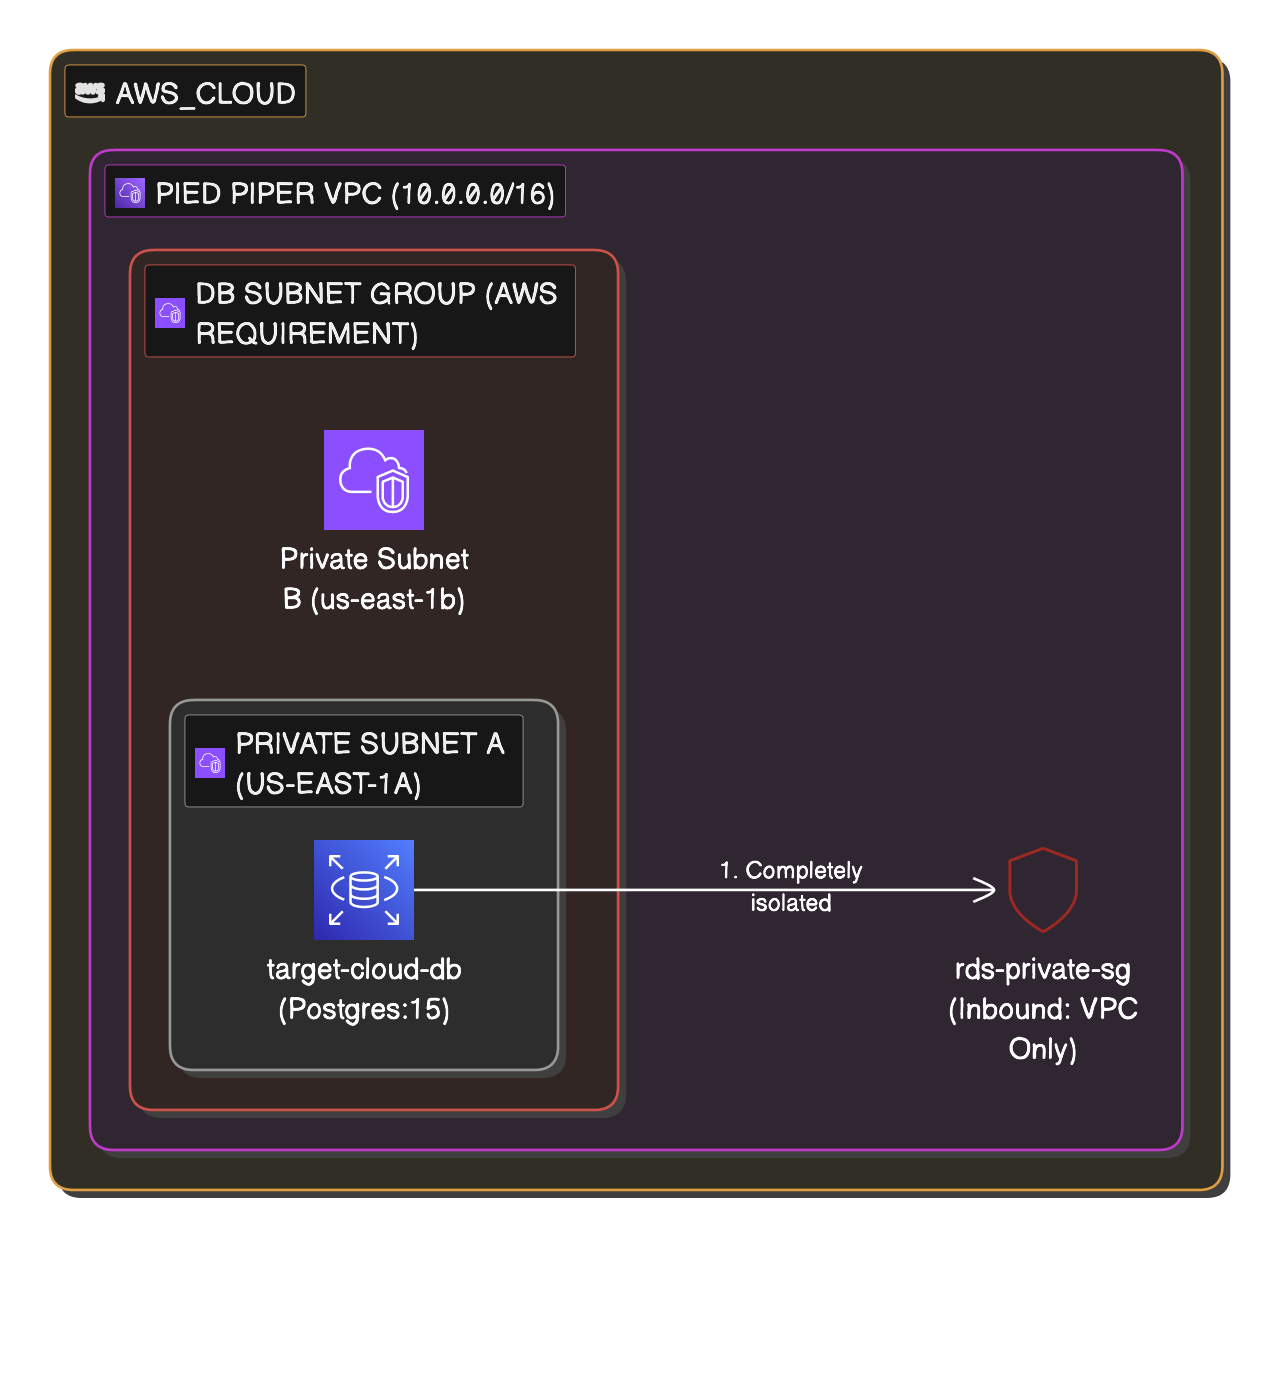
2. The Cloud Environment
Provisioned via Terraform, this environment features a secure VPC, private subnets, an RDS PostgreSQL instance, and a Virtual Private Gateway (VGW) ready to receive the VPN connection.
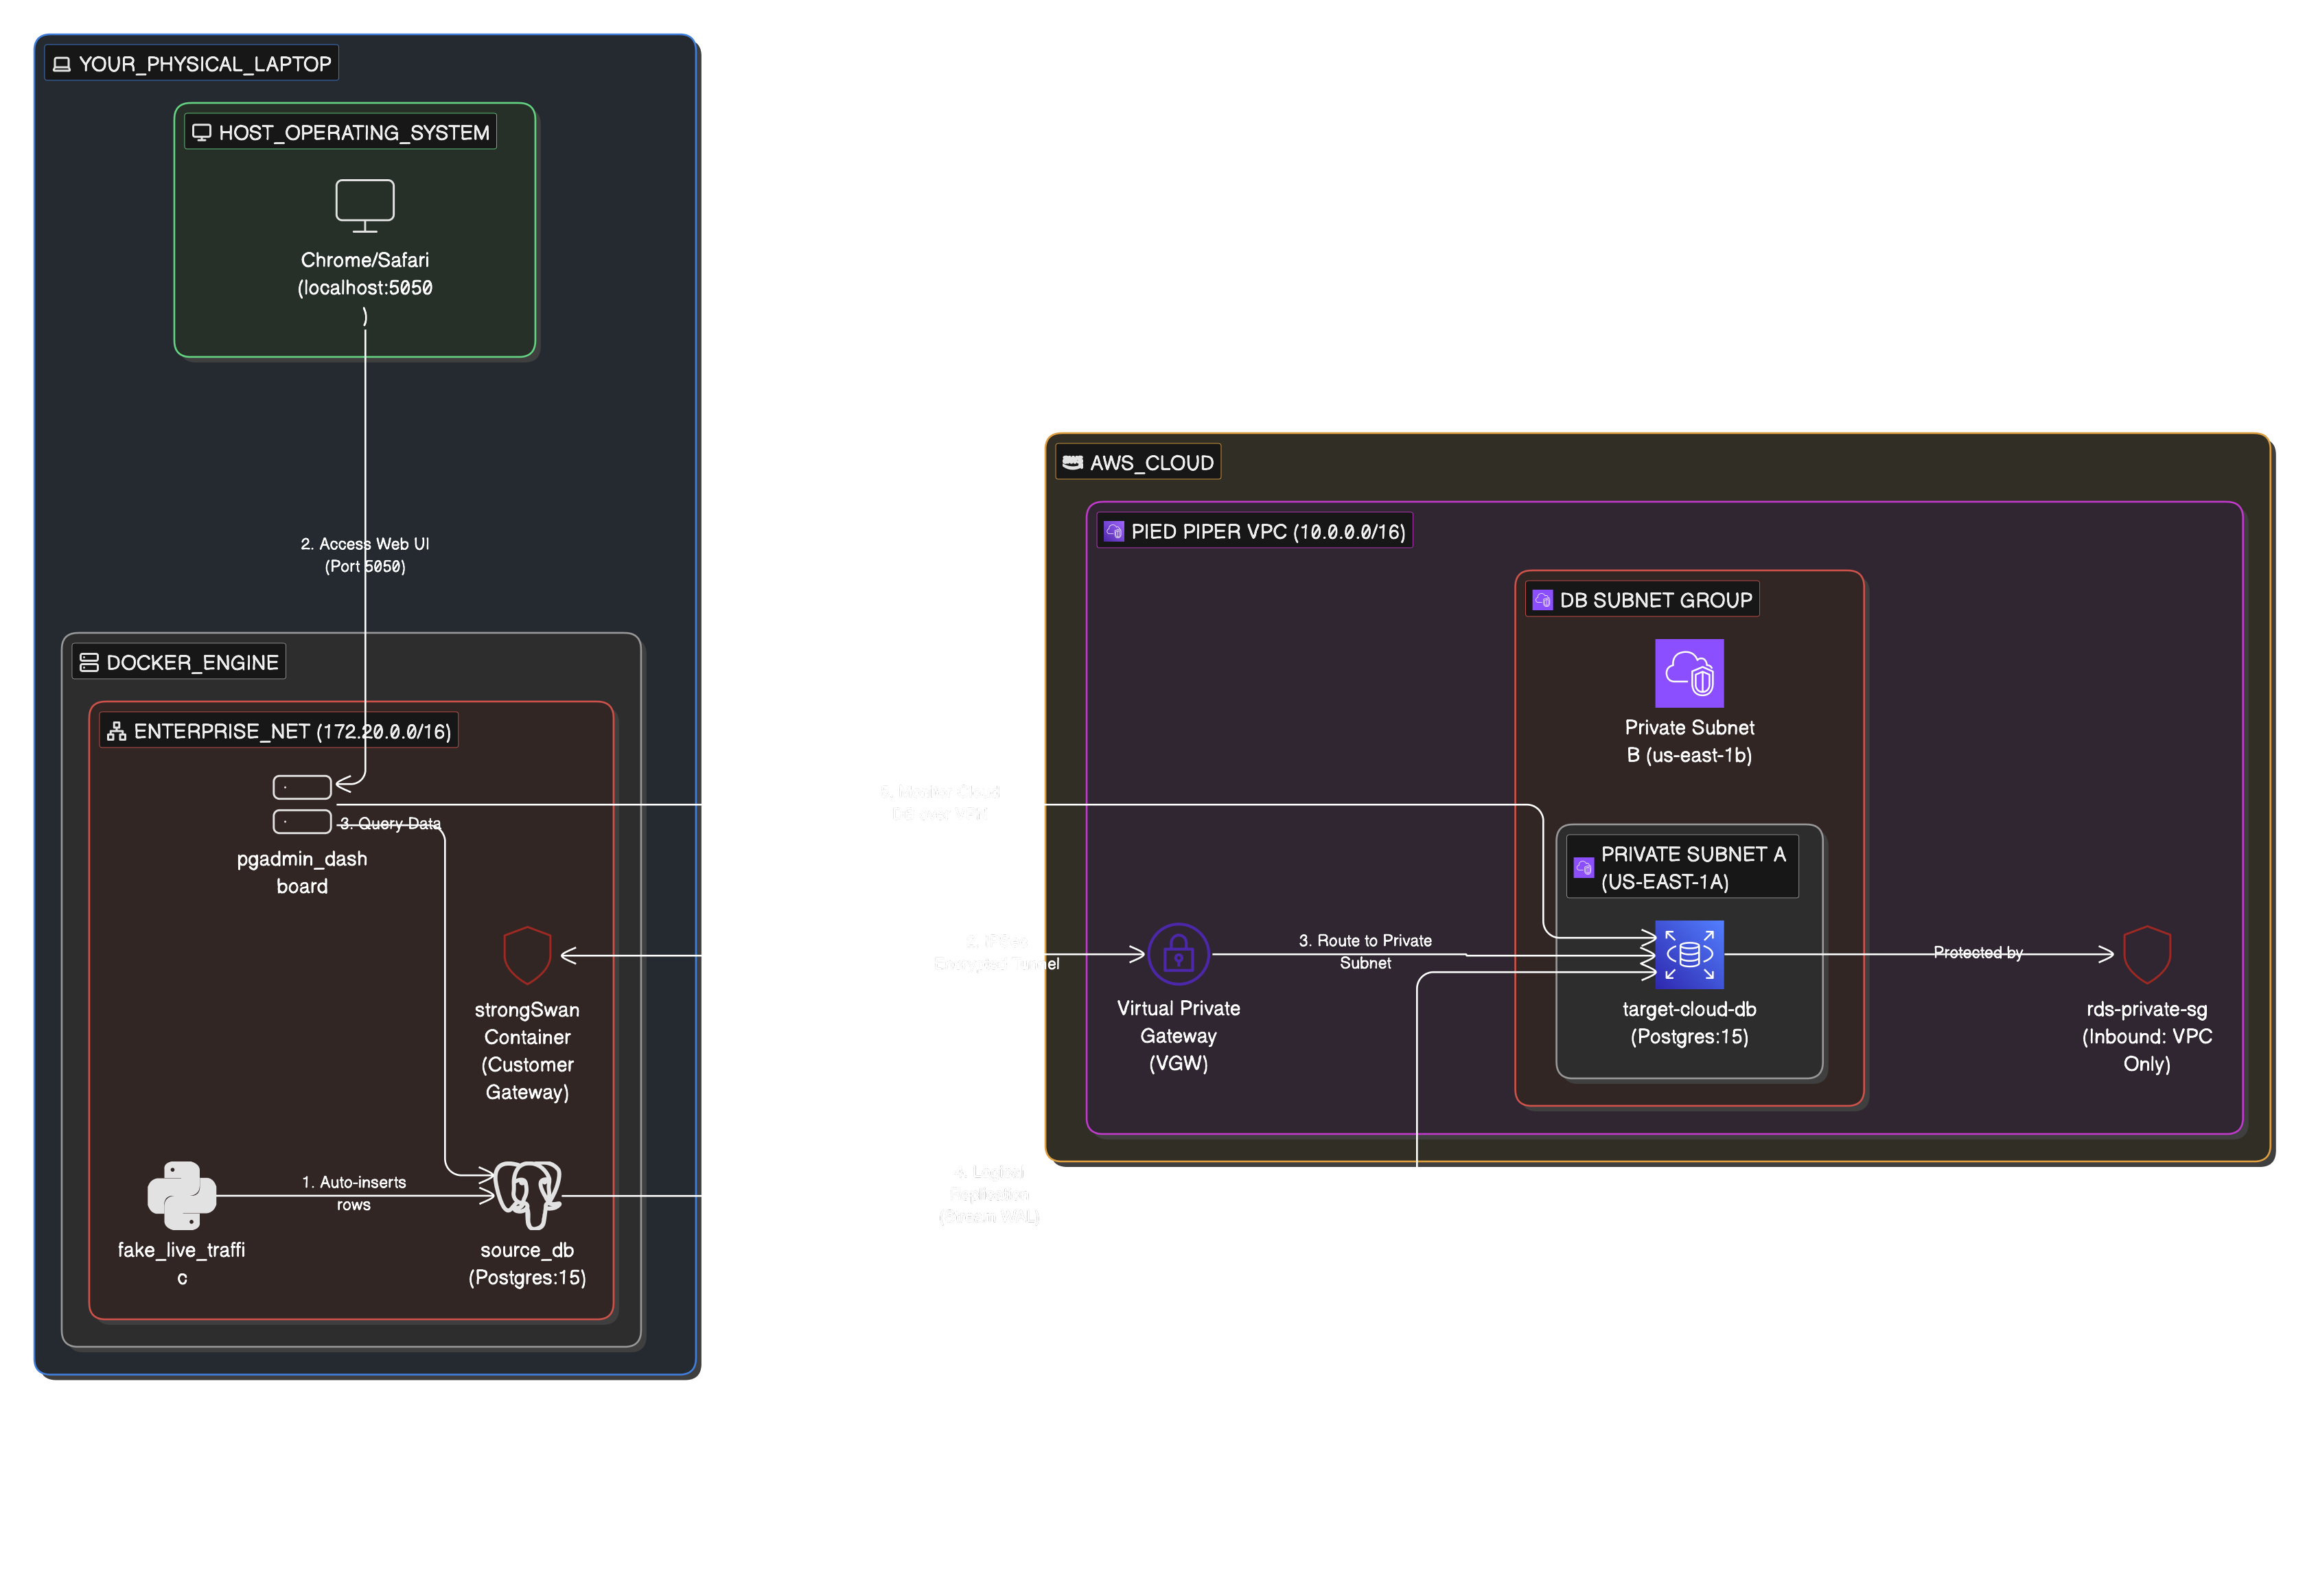
3. The Combined Migration Architecture
The strongSwan container establishes an IPsec tunnel to the AWS VGW, allowing the AWS RDS instance to securely reach back into the local Docker network and subscribe to the live transaction feed.
3. Prerequisites
- Docker & Docker Compose: To run the local environment.
- Terraform: To provision the AWS infrastructure.
- AWS CLI: Configured with credentials that have permission to create VPCs, RDS instances, and VPNs.
- psql: Installed locally (or accessible via your pgAdmin container) to execute the schema dump.
4. Step-by-Step Execution Guide
Phase 1: Start the On-Premise Infrastructure
- Navigate to the on-prem directory:
cd on-prem - Start the Docker containers:
docker-compose up -d --build - Verify the live traffic generator is working by checking the logs:
docker logs -f fake_live_traffic - Open your browser and navigate to
http://localhost:5050to access pgAdmin. - Log in using
admin@sunbirdanalytics.comand passwordsunbird_analytics. - Add the local server using host
source_db, usernamesunbird_analytics, and passwordsunbird_analytics. You will see thelive_orderstable actively populating.
Phase 2: Gather Required IP Addresses
Before provisioning the cloud, you need two critical IP addresses.
- Find your Public IP: Run
curl ifconfig.mein your terminal. Save this for Terraform. - Find your Source DB Docker IP: Run
docker inspect -f '{{range .NetworkSettings.Networks}}{{.IPAddress}}{{end}}' source_db. - Open
scripts/main.mdand replace the IP address in theCREATE SUBSCRIPTIONconnection string with this Docker IP.
Phase 3: Provision the AWS Infrastructure
- Navigate to the cloud setup directory:
cd ../cloud-setup - Initialize Terraform:
terraform init - Deploy the infrastructure (replace the placeholder with your actual public IP from Phase 2):
terraform apply -var="my_ip=YOUR_PUBLIC_IP_HERE" - Type
yesto confirm. This will take roughly 5-10 minutes to provision the RDS instance and VPN. - Once complete, retrieve your new RDS endpoint via the AWS Console or by running:
aws rds describe-db-instances \
 --region us-west-1 \
--db-instance-identifier target-cloud-db \
--query "DBInstances[0].Endpoint.Address" \
--output text
Phase 4: Map Your Infrastructure with Sunbird Insyte
Once terraform apply finishes and everything is successfully provisioned on AWS, you can visualize your new cloud environment.
Use Sunbird Insyte to automatically map all of your newly provisioned infrastructure. It will generate a clear overview of all your provisioned resources, giving you total visibility into your active cloud setup.

Phase 5: Configure the Site-to-Site VPN Tunnel
AWS has generated the keys for your VPN tunnel, but your local Docker container needs them to establish the connection.
- Log into the AWS Management Console and navigate to the VPC Dashboard -> Site-to-Site VPN Connections.
- Select your newly created VPN and click Download configuration (Vendor: Generic).
- Open the downloaded file and find the IPSec Tunnel #1 section to locate your Pre-Shared Key (PSK) and the Virtual Private Gateway IP (
<AWS_TUNNEL_IP>). - Update
vpn_config/ipsec.secretsin your project folder:<YOUR_PUBLIC_IP> <AWS_TUNNEL_IP> : PSK "YOUR_PRE_SHARED_KEY_HERE" - Update
vpn_config/ipsec.confin your project folder:leftid=<YOUR_PUBLIC_IP> ... right=<AWS_TUNNEL_IP> - Start Tunnel:
docker restart aws_ipsec_vpnthendocker exec aws_ipsec_vpn ipsec up aws-tunnel-1.
Phase 6: Inject Local Network Routes
Even with the tunnel "Up," the pgAdmin and Postpres containers need a map to find AWS.
- Find VPN Container IP:
docker inspect -f '{{range .NetworkSettings.Networks}}{{.IPAddress}}{{end}}' aws_ipsec_vpn - Add Route to pgadmin and local db containers so they know to send traffic destined for AWS: through the VPN tunnel:
docker exec -u root pgadmin_dashboard ip route add 10.0.0.0/16 via <VPN_IP>docker exec -u root source_db apt-get update && docker exec -u root source_db apt-get install -y iproute2 docker exec -u root source_db ip route add 10.0.0.0/16 via <VPN_IP> - Test Connectivity: From pgAdmin container, ping the AWS RDS endpoint to confirm connectivity:
docker exec -it pgadmin_dashboard ping <YOUR_RDS_ENDPOINT> - If the ping is successful, you have established a secure connection from your local Docker environment to AWS! You can now also connect to the AWS RDS instance from pgAdmin using the
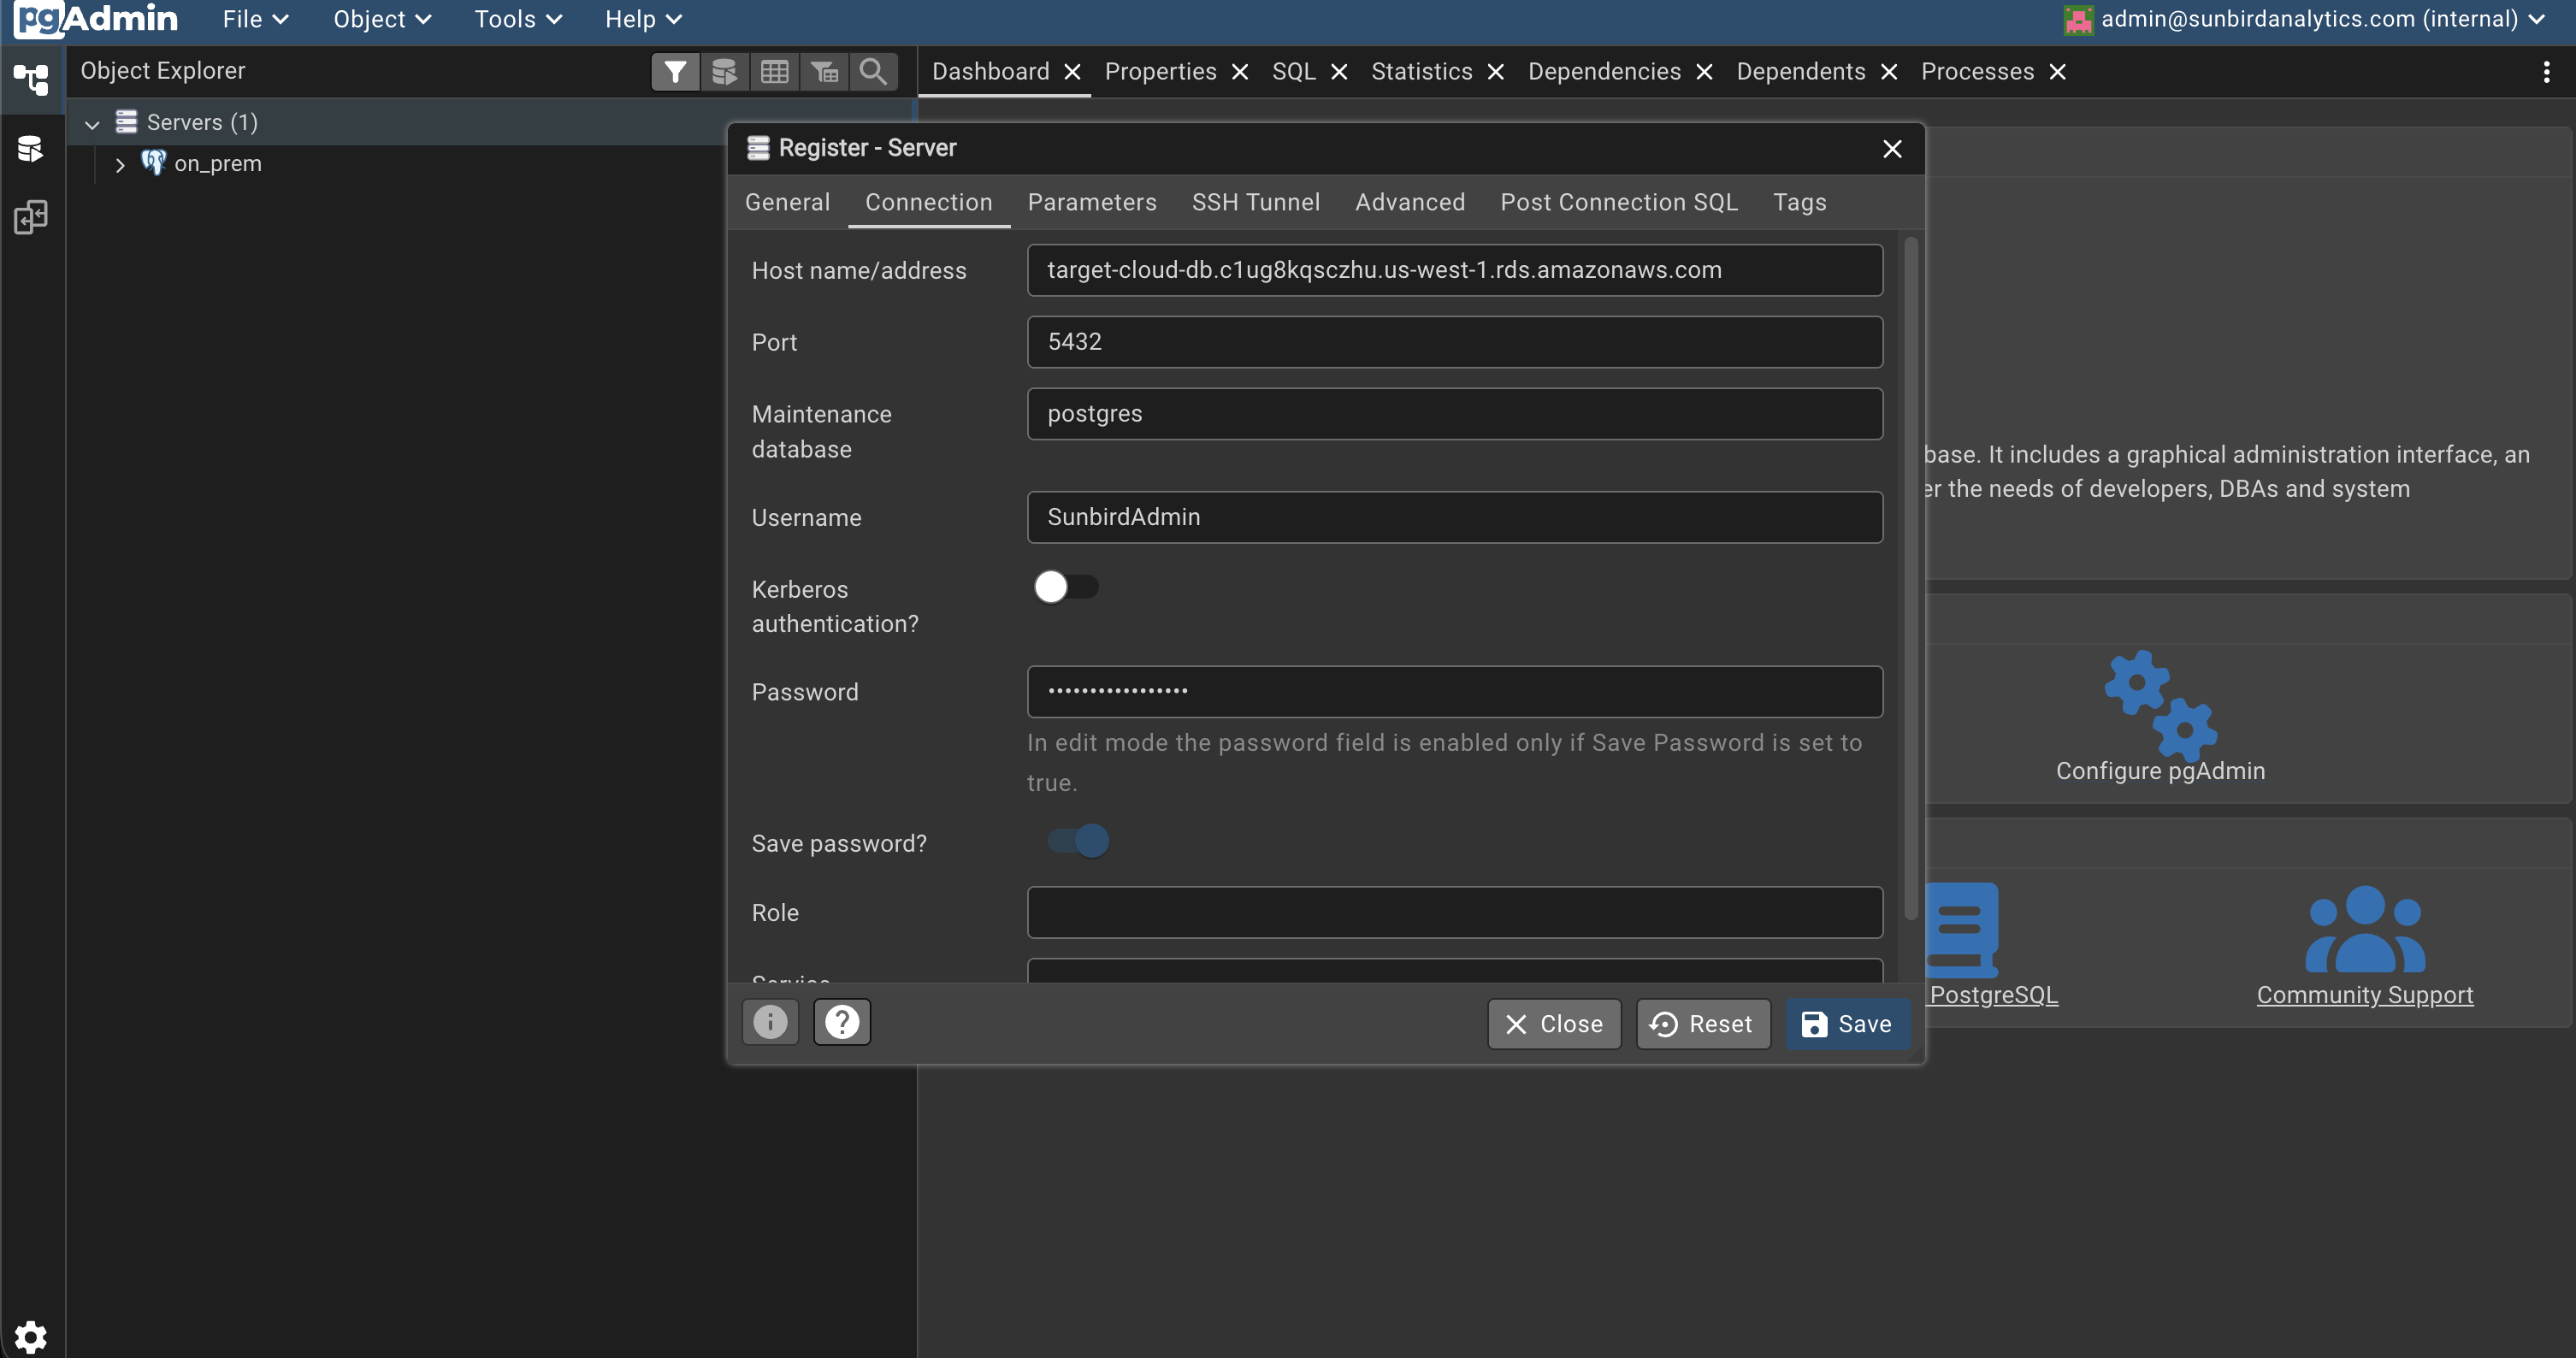
<YOUR_RDS_ENDPOINT>, usernameSunbirdAdmin, and the passwordsunbird_analyticsyou set in Terraform.
Phase 7: Execute the Migration Using PostgreSQL Publication and Subscription
1. Schema Migration
Export the schema from your Docker Postgres:
docker exec source_db pg_dump -s -U sunbird_analytics -d sunbird_analytics > schema.sqlImport the schema into AWS RDS. Open the schema.sql script and Copy all the text inside that file. Then, in pgAdmin open a query window connected from the cloud server to the postgres database on AWS RDS. Paste the entire schema.sql content and execute it. This will create all the tables and structures needed on AWS.
2. On the Source DB (Local Docker)
Create the "Publisher." This tells your local DB to start broadcasting every change to the transaction logs.
-- Run this in the 'sunbird_analytics' database on Localhost
CREATE PUBLICATION sunbird_migration_pub FOR ALL TABLES;
3. On the Target DB (AWS RDS)
Get the IP address of your local Docker Postgres container. This is the "host" that AWS will connect to.
docker inspect -f '{{range .NetworkSettings.Networks}}{{.IPAddress}}{{end}}' source_dbCreate the "Subscriber." This tells AWS to reach through the VPN and start sucking in data.
-- Run this in the 'sunbird_analytics' database on AWS RDS
CREATE SUBSCRIPTION sunbird_migration_pub
CONNECTION 'host=172.20.0.2 port=5432 user=sunbird_analytics password=sunbird_analytics dbname=sunbird_analytics'
PUBLICATION sunbird_migration_pub;
4. Reset Sequences (CRITICAL)
Postgres sequences (for ID columns) don't stay in sync during replication. You must manually "bump" them on AWS so the next ID used is correct.
Run this on AWS RDS:
-- This script resets all sequences to the current max ID + 1
SELECT setval(pg_get_serial_sequence('live_orders', 'id'), coalesce(max(id), 1)) FROM live_orders;
Need Help With Your Infrastructure?
Navigating complex database migrations and modernizing your cloud infrastructure doesn't have to be a solo mission.